If you are passionate about baking, I’m sure sourdough starter is not unfamiliar to you. After making a delicious batch of bread, you might find some leftover sourdough starter, but you don’t want to waste it by throwing it away. In fact, there are many ways to preserve your starter, such as refrigeration, drying, and freezing methods. In case you don’t bake or use sourdough often, you should choose the freezing method. Frozen sourdough bread just has the best quality within 3 months. Cake batter can be frozen from 2 to 3 months. However, you can store frozen sourdough starter for about 12 months.
So, why should we freeze sourdough starter, how to freeze it, and how to thaw it? Read on to find out more.
Why should you freeze sourdough starter?
Freezing sourdough starter can be a great option for several reasons, particularly if you don’t bake often. Here are a few reasons why you might choose to freeze your sourdough starter:
Storage for a long term: Instead of discarding the leftover sourdough starter after each baking, you can freeze it and thaw only when needed.
Save much time: The process of feeding a sourdough starter requires you to often add flour and water to keep the microorganisms inside active. However, by freezing the starter, you only need to do these steps when you actually plan to use it for baking. This can save you a lot of time.
No waste: It means that you no need throwing away the dough after baking, you can freeze the leftover sourdough starter for next time.
Backup plan: When baking sourdough, it’s not uncommon to have some problems with the dough. For instance, the dough might get contaminated or moldy if not stored properly, or you could accidentally spill the container. Therefore, having frozen sourdough starter on hand is an excellent backup solution.
How to freeze sourdough starter

Step 1: Feeding yeast before freeze sourdough starter
You should make your own sourdough starter and ensure it is in its best active state before freezing. This means you need to feed it a few hours in advance. Let’s feed them with equal parts of flour and water (1:1). For instance, use 50 grams of flour and 50 grams of water.
After feeding the sourdough starter for about 4-6 hours, it will start bubbling more and its size will double. At this point, your sourdough starter is ready to be frozen. Just keep a small amount of the dough that you need. Then, do the next step for the leftovers. Freezing the sourdough starter helps preserve the yeast better and also ensures the quality after it is thawed. So, you don’t have to worry too much about your next baking session
Step 2: Choosing the suitable preserving method
Each type of preserving method has its advantages and also disadvantages. You can choose from a glass jar, silicone tray, or plastic bag.
Glass jar: If you want to freeze your sourdough starter in a glass jar, it’s quite simple. Just pour it into a clean and dry glass jar. Here are a few small tips to follow:
- Leave a little space at the top of the jar for the starter to expand when frozen (about 20%).
- Make sure the jar lid is tightly closed to keep air out.
When it comes to a glass jar for storage, you might find that your starter is very safely preserved because it will not get moldy or absorb odors from other foods in the fridge. However, it can be inconvenient if you only want to use a small amount of starter and you have frozen a large quantity in one jar
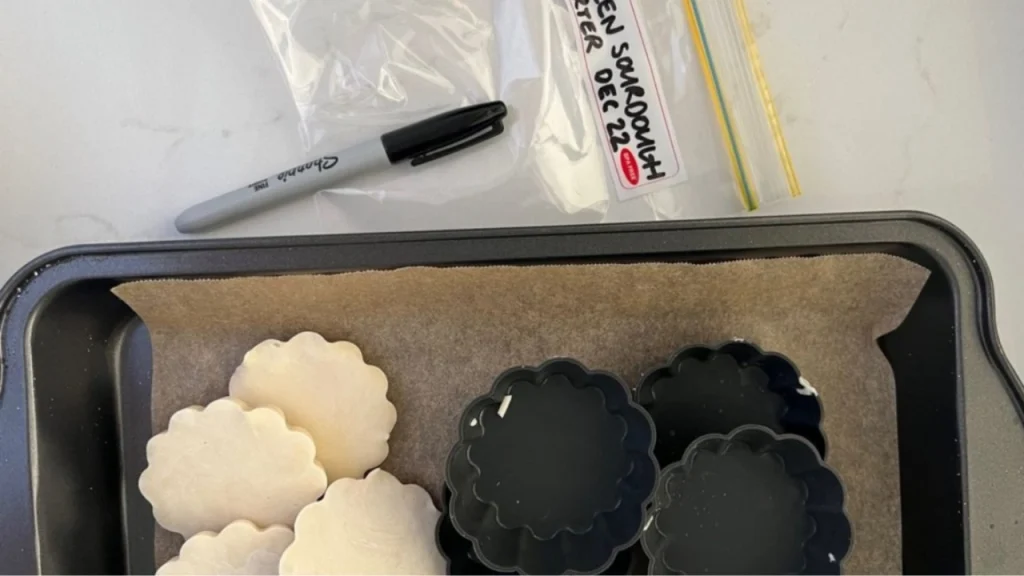
Ice silicone tray: Pour the starter into each compartment of the silicone tray, with each compartment holding just enough starter for one use. Next, place the silicone tray in the freezer until the sourdough starter is completely frozen. We recommend you use silicone trays because silicone is very flexible, thus it is easier to remove the frozen sourdough starter from the tray. However, a silicone tray might take up more space in your freezer compared to other preserving methods. Therefore, once the starter is frozen, you can remove it from the tray and place it into a large plastic bag to save space and ensure better preservation.
If you don’t have a silicone tray, you can use silicone molds, an ice cube tray, or muffin tins as alternatives.
Plastic bag: First, you need to choose sturdy zip-lock plastic bags. The amount of starter in each bag should be just enough for one use, so you don’t have to thaw the entire bag. Then, squeeze out all the air from the bag before sealing it to minimize the formation of ice crystals, which helps preserve the starter better. Finally, just place the plastic bags in the freezer compartment of your refrigerator. However, plastic bags also have a small drawback, as they can be punctured or leak if not handled carefully during use or storage.
Note that: It’s important to seal the bags tightly to prevent freezer burn.
Step 3: Label

On the label, you should clearly note the freezing date and the type of flour to accurately identify the starter when needed, avoiding confusion. Additionally, this helps you manage the starter inventory by the ‘first in, first out’ principle, ensuring the quality of the starter for each baking session.
Step 4: Freezing sourdough starter
Place the starter in the freezer compartment of your refrigerator. It can be preserved this way for several months without affecting its quality
How to thaw freeze sourdough starter
After freezing your sourdough starter, you obviously need to thaw it if you want to bake it again. Plan to start a schedule a few days before you begin.
- Take a sufficient amount of sourdough starter out of the freezer. I recommend you to not place it directly at room temperature. First, keep your frozen starter in the fridge at +4°C (about 39°F) for around 24 hours. Your process has to include this step, as it will prevent the starter from shocking temperature.
- Next, you place the partially thawed starter at room temperature, about 20°C (68°F). This step will take a few more hours until the starter is completely thawed.
- Check and stir: Once the starter has fully thawed, check its consistency. If it seems to have separated, don’t worry too much, just stir it well.
- To reactivate the starter, you need to feed it again. Add flour and water in the ratio 1:1:1. For example 1 ounce starter, 1 ounce water, 1 ounce flour. And keep it in a warm place until it starts to become active again. This might take a few hours to a day.
- Continue feeding until you notice signs like increased size and bubbling, then it’s ready for a delicious batch of bread
Final Thought
To sum up, Freezing your sourdough starter is a practical way to keep it fresh, especially if you don’t bake often but still want to maintain its quality. The freezing process involves four simple steps that require patience and careful handling to prevent the yeast from dying.
The article “How to freeze sourdough starter” has provided you with the essential steps to ensure that your sourdough starter is always ready for your next baking session without any issues. By following these guidelines, you can be confident that your starter will stay healthy and active, making your baking activities smooth and enjoyable every time.


